
My favourite Soviet armoured fighting miniature I’ve currently got in 1/72nd scale is the Russian SU-76M model. It was a Russian made self propelled gun, used extensively during World War II – so I definitely need many models of them on my wargaming table.
(The tanks full name is the Samokhodnaya Ustanovka 76mm main production tank, for further reading check out the SU-76M on Wikipedia)
My recipe for painting this batch of SU-76Ms is listed below; the tank models themselves are from the great 1/72nd range by Plastic Solider Company.
This trio of Russian tanks also saw me trialling a new technique – chipping fluid!

Painting recipe for 1/72 Russian SU-76M tanks
Prime the model with Halfords Grey Primer

My good friend and fellow wargamer, Andy, recommended Halfords primer a while back. I haven’t found anything better since. A large can, good coverage, good colour, good finish.
So much easier than airbrush primer if you’re doing more than a single figure too.
Airbrush on AK Interactive’s Worn Effects

This went on super easy, plus a little in the airbrush’s paint-hopper went a long way. Best to do this in good lighting, as it’s rather hard under bad lighting to see where you’ve sprayed a clear liquid. The AK Worn Effects seems to dry within 10-15 minutes.
I didn’t bother airbrushing this on the tracks or the inside of the fighting compartment.
This was a new painting technique for me – I’d not used a chipping fluid before. Applying it was an airbrush couldn’t have been simpler though.

Once completely dried (better to err on the side of caution here), time to move onto painting the main tank colour.
Airbrush on several thin coats of Vallejo Air 71.017 Russian Green

This actually isn’t the green Air paint I wanted to use, but it turns out the Vallejo Air I wanted I hadn’t actually bought! Plus – there’s no correct green when it comes to Soviet armour – right?
While I left the back panel of the fighting compartment off, it was still a bit fiddly to spray inside.
TIP; Next time I grab some new SU-76Ms, I think I’ll leave the whole casement armour off to spray and paint separately.
From memory – the green I wanted to paint was Vallejo’s 70.894 Cam. Olive Green.
Scrub away the Vallejo paint to produce the chipped effect
With a fairly stiff paintbrush dipped in water, I scrubbed away at various panels, edges and areas of interest that I wanted to show wear-and-tear. This was a little tougher than I expected, probably due to the multiple thin layers of Russian Green I had applied, but the Worn Effects product did it’s job.

Three chipped SU-76m models. Left to right they get progressively more damaged / scuffed up. I used a mix of stuff paintbrushes, cocktails sticks and even a small modelling file to remove the top layer of paint off. (Sorry for the harsh lighting)
Tip: apply the water to an area and let it soak for a minute or two, then go to work scrubbing the area. This seemed to really aid the chipping process.
I’m not sure the mid-tone grey was the best colour to have revealed underneath the green – I may experiment in the future.
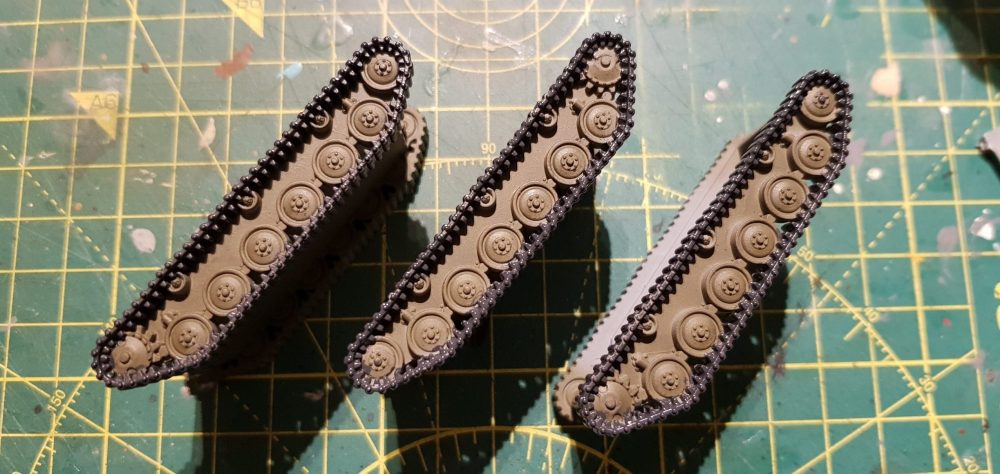
Paint the tracks and road wheels

I then painted my tank tracks a dark grey; with a 3:1 mix of Vallejo 71.273 (Ocean Grey) and Vallejo 70.950 (Black).
I wasn’t super neat with this as I knew they’d be getting a good dark-wash, as well as some mud effects applied later on.
As a personal choice, I also glued in 2 small coins into the inside of the hull at this stage. This adds just a little bit of extra weight to each SU-76 model. Totally a personal preference, but as these 1/72nd tanks are obviously quite small, the additional weight makes them feel nicer in the hand.
TIP; these coins came loose in one of the miniatures recently. I think Superglue and coins were too brittle. In future I may try part-filling the hull with pva & ballast.
Just be aware that the firing compartment of the upper hull sits into the lower hull, so dry fit any coins / weights before you affix them.
Tip: While you have some dark grey mixed up, I would also paint the tool heads and towing cable on the tanks hull. I waited till later, which required mixing up some more dark grey, but I think for future SU-76m models, I’ll do it at this stage.
I also painted the outside of the road wheels with a flat black colour, as these are usually hardened rubber. I left the much smaller return wheels Russian Green. This was one of the slowest and most tedious parts of painting the SU-76 – each model has 14 small road wheels to paint, so that’s 42 for all three SU-76s.
Seal the main colour in with gloss varnish

With the AK Interactive’s Worn Effect having done its job, its time to seal the Russian Green paint so that it stops chipping!
To do this, just give the model a two thin coats of matt varnish from the airbrush. I was told to leave about 15-20 minutes between coats – so do that too.
I used Vallejo’s Gloss Varnish 70.510
Not only does a gloss varnish protect the paint from further chipping, it’ll allow the pin wash stage to be much more effectively.
Tip: give the varnish a real good shake before use. Although its got a low viscosity – I’ve heard a lot of people saying they have issues with varnishes in general if they’re not mixed/shaken well.
Apply any Soviet decals

My SU-76’s don’t have many decals, and the PSC platoon tank box doesn’t come with any, however in my Battlegroup games I like to track ammo using the tank’s turret number. So I had some spare Soviet decals I bought from eBay, link at the end of the article, so I applied those to the models using Humbrols DecalFix.
Just soak the decals in a few drops of this stuff for 3-4 minutes, then slide them onto a surface that also has been washed down with the fluid. Position with a soft paint brush and then leave it well alone!
If I was applying these decals on a turret or side of the tank (instead of the firing casement) I would have varnished the decals at this stage. However, due to laziness, I waited a few steps to do it.

The three SU-76 model tanks with decals affixed. Turret numbers #1 thru to #3. Probably not historically accurate, but I don’t care.
Paint the engine exhaust & hand tools

One of the nice things about the PSC SU-76m models is that they come with some nicely sculpted exhaust pipes and hand-tools on the tanks hull.
I painted the handles of the tools with Vallejo paint – 70.984 Flat Brown.
The towing cable, tool heads and a few bits-n-bobs were painted with a dark grey, mixed 1:1 from 70.950 Black and 71.273 Ocean Grey paints.
I wasn’t quite sure how to paint the SU-76 exhausts; online research (aka Google images), showed a variety of different colours and finishes.
I settled on painting the SU-76 exhaust pipes an experimental mix of 70.984 Flat Brown and Citadels Gehenna’s Gold. Once dried, I washed it down with 76.514 Dark Brown Wash. In the picture below you can see the result, which I’m quite happy with.

You can just make out the right-hand model has another Soviet decal on the side of the casement – no idea what it says – but I like it’s positioning. (This picture was taken before the tools and towing cables were printed)
The high shine and reflection seen in the middle tank is because at this stage, they’re still coated with gloss varnish.
Paint inside the SU-76’s casement compartment
Unlike the larger SU-76 models, such as the 1/35 Tamiya kit on Amazon, these 1/72nd scale models from PSC have a lot less detail inside the casement. This is obviously understandable and once you’ve got two figures stood in there, it’s almost impossible to tell anyway.
Apart from a bit of edge highlighting on the sharp boxy corners, the only other thing I painted inside the casement was the shells, (Vallejo black), and then added either white or red tips. This isn’t historically accurate, my research turned up that WW2 Soviet shells were usually black (the brass casings were left unpainted), however I thought I’d add a bit of colour to ‘represent’ high-explosive and armour-piercing rounds.
For the main gun, I painted some Runefang Steel silver on what I think is the bare metal parts of the breach / loading components. At 1/72nd scale this part of the gun probably isn’t too realistic, but I think the addition of a bit of contrast works well.
Apply washes to the model
I only had acrylic washes, so I did my pin washes with those. It’s not ideal as you can’t tidy up the fast-drying wash as easily, like you can with enamel based ones. However, you got to use what you’ve got.
Although I forgot to take any photos, I used Vallejo’s 76.517 Dark Grey Wash for pin washing these SU-76s.
I carefully applied a small amount of wash to all the panel edges, rivets, around the tools and into some of the boxed in corners. The gloss varnish helps make the wash flow into the corners a bit better.
The inside of the casement got a more thorough ‘general’ washing, mainly around the shells and the floor. Below you can see the main gun and rear casement panel.

NOTE; before completing the model I actually went back and used AK’s black Paneliner on the sharp recesses. I would say its a bit better than using just the Vallejo’s black acrylic wash – but it wasn’t a game changer.
Seal the decals with varnish
At this point I sealed in the decals and paint using a quick thin layer of my gloss varnish from the airbrush. This’ll stop any additional painting layers disrupting the transfer.
I went with gloss varnish as I thought it might make cleaning up any mistakes in the the next few steps easier, if needed.
Apply mud effects
At this point the Russian tanks were looking pretty good (for my standard). I toyed with the idea of leaving them chipped but clean, however I decided I’d give them a bit of mud (to hide some of the painting crimes).
I applied some AK Interactive’s Mud Effects on the inside of the hull between the tank tracks. This was a bit fiddly but all it required was patience.
I then added some AK mud to the tracks themselves, but I carefully wiped away the majority, leaving just traces of it in the grooves. A fine amount was also stippled onto the road wheels and underneath the hull itself.
Final varnish seal

Probably the most important varnishing stage – matt varnish takes away 90% of the horrible gloss finish from the previous varnishing steps. It’ll obviously protect the SU-76s new paintwork against accidental knocks on the table-top too (within reason).
A couple of thin coats of Vallejo’s 70.520 matt varnish (well shaken beforehand) did the job.
TIP; Although I planned to use the airbrush for this – it was all packed away – so I tried a normal cheap brush. It worked great! (Just give it a good clean afterwards)
Gun Crew
I saw conflicting evidence on what the crew of SU76s would have worn while inside their tanks, or in fact any Soviet tank crew. I went with a bit of artistic license and decided to go with dark blue overalls I’ve seen in some pictures. Then I realised the miniatures from PSC are in standard infantry clothing, not boiler-suit style overalls. I made the decision that you couldn’t see enough of their clothing for it to be noticeable – so I painted them as if they were overalls.
I used the following recipe for the crew:
- Primed white, using Vallejos White Primer, brushed on
- Based in Citadels Russ Grey
- A light wash with Vallejo black wash, diluted 1:1 with water beforehand
- Skin: Kislev Flesh; washed with Agrax Earthshade
- Shells, Citadels Gehennas Gold
- The boots and helmets (/head protectors) were done in Citadels Black Templars contrast
The final result was a lighter shade of blue than I imaged – but the contrast against the tanks green works for me.
Beauty Shots
With all the paint, decals and mud applied to the tanks – this is the final look for my battle-ready Russian SU-76m models:

Painting summary for the SU-76 models
To sum up the painting recipe, I used the following products to paint these Russian SU-76m miniatures: (Some links are to Amazon, where you can also pick the products up)
- Plastic Soldier Company – SU-76m Tank Platoon [PSC Site]
- 1/72nd Soviet Decals [PSC Site]
- AK Interactive – Worn Effects [Amazon]
- AK Interactive – Black Weathering Pigment [Amazon] – Not used in the end
- Halfords – Grey Primer [Halfords Site]
- Games Workshop – Citadel – Gehenna’s Gold [GW Site]
- Vallejo – 71.017 Russian Green [Amazon]
- Vallejo – 70.894 Cam. Olive Green [Amazon]
- Vallejo – 70.520 Matt Varnish [Amazon]
- Vallejo – 71.273 Ocean Grey [Amazon]
- Vallejo – 70.950 Black [Amazon]
- Vallejo – 76.514 Dark Brown Wash [Amazon]
- Humbrol – DecalFix [Amazon]